
使用guestfish修改镜像
1.下载qcow2镜像
下载地址:https://cdimage.debian.org/cdimage/openstack/
2.guestfish安装
apt install libguestfs-tools
3.使用openssl passwd -1 生成加密的密码
-1表示使用MD5算法对密码进行加密
root@kvm:~# openssl passwd -1 123456
$1$4Ezzl8Mo$2fWcpRpFCV9wFLkVuKrcJ.
4.使用guestfish命令进入交互命令界面
依次执行run、list-filesystems、mount等指令
root@kvm:/var/lib/libvirt/images# guestfish --rw -a debian-10.10.0-openstack-amd64.qcow2

Welcome to guestfish, the guest filesystem shell for
editing virtual machine filesystems and disk images.

Type: 'help' for help on commands
      'man' to read the manual
      'quit' to quit the shell

><fs> run
><fs> list-filesystems
/dev/sda1: ext4
><fs> mount /dev/sda1 /
><fs>
5.修改root密码
vi /etc/shadow
root:*:::::::
daemon:*:::::::
bin:*:::::::
sys:*:::::::
sync:*:::::::
games:*:::::::
.....
将root:后面的第一个*替换为第二步加密之后的密码
root:$1$4Ezzl8Mo$2fWcpRpFCV9wFLkVuKrcJ.:::::::
还有个更方便的,方法使用virt-customize重置root密码,也是需要先安装libguestfs-tools包。
virt-customize -a debian-10-genericcloud-amd64.qcow2 --root-password password:debian
6.开启root账号ssh远程登录
vi /etc/ssh/sshd_config
找到
找到
#PermitRootLogin prohibit-password
改为
PermitRootLogin yes
找到
#PasswordAuthentication yes
取消注释
PasswordAuthentication yes
最后执行quit命令退出guestfish
SSH无法远程
启动镜像VNC连接,配置好网络后,内外网能PING通,但SSH无法登陆
执行systemctl status sshd看到报错 Could not load host key
这是因为新版的opensshd 中添加了ed25519 做签名验证,而之前系统里没这个算法的证书。生成一下就好了
执行以下命令
ssh-keygen -A
- 或者
ssh-keygen -t ed25519 -f /etc/ssh/ssh_host_ED25519_key
- 然后
service sshd restart
执行之后就能正常远程了
参考:https://www.jianshu.com/p/f2b1370d87ac
apt update失败
先更换一下163的软件源
vim /etc/apt/sources.list
deb http://mirrors.163.com/debian/ buster main non-free contrib
deb http://mirrors.163.com/debian/ buster-updates main non-free contrib
deb http://mirrors.163.com/debian/ buster-backports main non-free contrib
deb-src http://mirrors.163.com/debian/ buster main non-free contrib
deb-src http://mirrors.163.com/debian/ buster-updates main non-free contrib
deb-src http://mirrors.163.com/debian/ buster-backports main non-free contrib
deb http://mirrors.163.com/debian-security/ buster/updates main non-free contrib
deb-src http://mirrors.163.com/debian-security/ buster/updates main non-free contrib
执行apt update会报错,查了下是DNS的问题
写入/etc/resolv.conf文件,重启后会失效
所以采用网络配置文件加上dns-nameservers
如下所示
vim /etc/network/interfaces
# This file describes the network interfaces available on your system
# and how to activate them. For more information, see interfaces(5).

# The loopback network interface
auto lo
iface lo inet loopback

# The normal eth0
allow-hotplug eth0
iface eth0 inet static
        address 192.168.3.129
        netmask 255.255.255.0
        gateway 192.168.3.1
        dns-nameservers 192.168.3.1
iface eth0 inet6 dhcp
# Additional interfaces, just in case we're using
# multiple networks
#allow-hotplug eth1
#iface eth1 inet dhcp

#allow-hotplug eth2
#iface eth2 inet dhcp

# Set this one last, so that cloud-init or user can
# override defaults.
source /etc/network/interfaces.d/*
之后在执行apt update就正常了
qcow2镜像扩容
使用 qemu-img info查看当前镜像
可以看到容量是20G
实际占用1G
root@kvm:~# qemu-img info debian-10.10.0-openstack-amd64.qcow2
image: debian-10.10.0-openstack-amd64.qcow2
file format: qcow2
virtual size: 20G (21474836480 bytes)
disk size: 1.0G
cluster_size: 65536
Format specific information:
    compat: 0.10
    refcount bits: 16
镜像扩容
加个40G
root@kvm:~# qemu-img resize debian-10.10.0-openstack-amd64.qcow2 +40g
Image resized.
root@kvm:~# qemu-img info debian-10.10.0-openstack-amd64.qcow2
image: debian-10.10.0-openstack-amd64.qcow2
file format: qcow2
virtual size: 60G (64424509440 bytes)
disk size: 1.0G
cluster_size: 65536
Format specific information:
    compat: 0.10
    refcount bits: 16
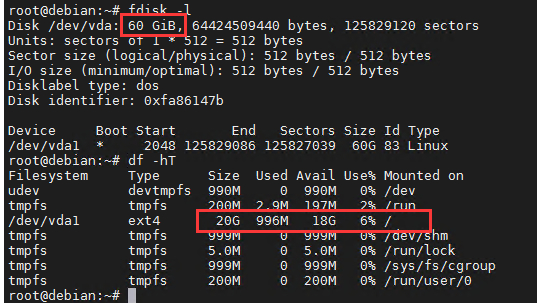
启动镜像
可以看到磁盘已经变60G了,但挂载的根目录还是20G
使用 growpart 来调整映像分区的大小
安装growpart
apt install cloud-guest-utils
扩容分区
运行以下命令扩容分区
此示例以扩容系统盘为例,/dev/vda和1之间需要空格分隔。如果需要扩容其他分区,请根据实际情况修改命令。执行结果如下所示。
growpart /dev/vda 1
扩容文件系统
扩容ext*(例如ext4)文件系统:运行以下命令扩容文件系统。
扩容系统盘/dev/vda1的文件系统。
root@debian:~# resize2fs /dev/vda1
resize2fs 1.44.5 (15-Dec-2018)
Filesystem at /dev/vda1 is mounted on /; on-line resizing required
old_desc_blocks = 3, new_desc_blocks = 8
The filesystem on /dev/vda1 is now 15728379 (4k) blocks long.
再次执行df -hT查看已经变成60G了
root@debian:~# df -hT
Filesystem     Type      Size  Used Avail Use% Mounted on
udev           devtmpfs  990M     0  990M   0% /dev
tmpfs          tmpfs     200M  2.9M  197M   2% /run
/dev/vda1      ext4       60G  998M   56G   2% /
tmpfs          tmpfs     999M     0  999M   0% /dev/shm
tmpfs          tmpfs     5.0M     0  5.0M   0% /run/lock
tmpfs          tmpfs     999M     0  999M   0% /sys/fs/cgroup
tmpfs          tmpfs     200M     0  200M   0% /run/user/0
qcow2镜像体积压缩
要减少qcow2镜像文件的体积,可以使用qemu-img工具提供的"convert"命令来执行转换和压缩操作
qemu-img convert -O qcow2 -c input.qcow2 compressed.qcow2
在上面的命令中,"input.qcow2"是输入的原始qcow2镜像文件,"compressed.qcow2"是输出的压缩后的qcow2镜像文件。
通过使用"-c"选项,qemu-img工具会在转换过程中对镜像进行压缩。这将应用压缩算法来减小文件的体积。压缩算法的选择取决于qemu-img版本和可用的压缩选项
请注意,在镜像转换和压缩过程中可能需要一些时间,具体取决于镜像文件的大小和系统性能。
参考文章:
https://www.bbsmax.com/A/ZOJPe4ao5v/
http://www.shadowindy.com/wordpress/index.php/2019/10/18/17/
https://help.aliyun.com/document_detail/113316.html
https://www.jianshu.com/p/f2b1370d87ac
https://docs.openstack.org/image-guide/modify-images.html#guestfish